A Basic Overview of Tiling
Before diving into the nitty-gritty of tiling, it’s essential to understand what it is and why it plays a pivotal role in both residential and commercial settings.
What is Tiling?
Tiling is the process of covering a surface, typically a floor or wall, with tiles. Tiles are thin objects, usually square or rectangular in shape. They are manufactured from a variety of materials including ceramic, stone, metal, baked clay, or even glass. The art of tiling involves precise placement of these tiles in a manner that is aesthetically pleasing and practical, often achieved with the help of tile adhesives. For an in-depth understanding of how tile adhesives work, you can read our complete guide.
Why is Tiling Important?
The significance of tiling extends beyond its obvious aesthetic appeal. It serves a multitude of functions, making it an integral part of any building, be it a cozy home or a sprawling commercial establishment.
- Durability: Tiles are known for their durability and long lifespan. Properly installed and maintained tiles can withstand heavy traffic, water, and even pets, making them a practical choice for high-usage areas.
- Versatility: Tiles come in an array of colors, textures, and sizes. This vast selection allows them to adapt to any design style, from rustic to contemporary. Check out our article on the top 5 trends in tiling for 2023 to get some design inspiration.
- Low Maintenance: Tiles are relatively easy to clean and maintain. Unlike carpet or wood, tiles do not absorb stains or odors, making them an ideal choice for kitchens, bathrooms, and busy commercial spaces. For tips on maintaining your tiled surfaces, refer to our easy cleaning tips.
- Health: Tiles do not attract dust mites, mold, or bacteria, making them a healthy choice, particularly for those with allergies.
- Environmentally Friendly: Many tiles, especially ceramic ones, are made with natural materials, making them an environmentally friendly choice. To learn more about sustainable tiling, read our article on eco-friendly tiling: sustainable choices for your home.
Understanding the basics of tiling provides a solid foundation for exploring more complex aspects of this craft, such as tile selection, installation techniques, and maintenance tips. Whether you’re a homeowner looking to renovate your space or a contractor seeking to hone your skills, gaining a thorough understanding of tiling is essential.
Getting Started with Tiling
If you’re ready to jump into the world of tiling, it’s crucial to understand the process and the essential tools you’ll need. Let’s break it down into manageable steps and discuss the key instruments that will make your tiling journey a success.
Step-by-Step Guide to Tiling
- Plan Your Layout: Before you dive in, it’s important to plan your layout. Measure the space you’ll be tiling and decide on the pattern you want to create. This is where you can let your creativity shine! If you need inspiration, check out our article on transforming spaces with creative tiling patterns.
- Prepare the Surface: Ensure the surface you’ll be tiling is clean, dry, and flat. Any dirt, moisture, or unevenness can interfere with the adhesion of the tiles.
- Apply Adhesive: Using a notched trowel, spread a layer of adhesive on a small section of the surface. Learn more about adhesives in our complete guide to understanding tile adhesives.
- Lay the Tiles: Carefully place your tiles onto the adhesive, using spacers to maintain even gaps between the tiles for grout.
- Cut Tiles as Needed: For edges or corners, you may need to cut tiles to fit. Always be careful when cutting tiles to avoid injury.
- Allow Adhesive to Set: Leave the tiles to set for the time recommended by the adhesive manufacturer.
- Apply Grout: Once the tiles have set, apply grout into the gaps between tiles using a grout float. For best results, read our article on grouting techniques for perfect finishes every time.
- Clean Up: Wipe away any excess grout with a damp sponge, being careful not to dislodge the grout in the gaps.
- Seal the Grout: After the grout has dried, apply a sealant to protect it from moisture and stains.
Essential Tools for Tiling
When it comes to tiling, having the right set of tools can make the process easier and more efficient. Here are some essential tools you’ll need:
- Tape Measure and Square: To plan your layout accurately.
- Notched Trowel: For spreading adhesive.
- Tile Cutter or Wet Saw: To cut tiles as needed.
- Tile Spacers: To ensure even gaps between tiles.
- Grout Float: For applying grout.
- Sponge: To clean up excess grout.
- Sealant and Applicator: To protect the grout after it has dried.
Remember, good quality tools can make a significant difference in the ease and quality of your tiling project. And, equally important, always ensure safety when handling these tools.
By following this guide and using the essential tools, you can embark on your tiling journey confidently. If you’re interested in more advanced techniques or tackling bigger projects, don’t miss our article on advanced tiling tips for commercial projects. Happy tiling!
Choosing the Right Tiles
Selecting the perfect tiles for a project can be quite a task. Tiles come in many shapes, sizes, and materials, each with its own unique properties. The choice of tiles can greatly influence the look and feel of a space, as well as its durability and maintenance requirements.
Considerations for Tile Selection
When selecting tiles for a tiling project, several factors need to be considered. These include the area of installation, the size of the space, the exposure to moisture and heat, the desired aesthetic, and of course, the budget.
For instance, a bathroom might require water-resistant tiles that can withstand high humidity levels. On the other hand, a kitchen might benefit from easy-to-clean, stain-resistant tiles. Smaller tiles can help make a small bathroom appear larger, while larger tiles can lend a sense of grandeur to a spacious living room.
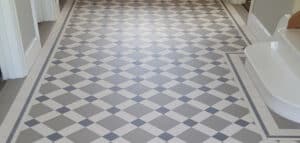
The color and pattern of the tiles can also greatly affect the ambiance of a room. Light-colored tiles can make a room appear larger and brighter, while darker tiles can lend a cozy, intimate feel. For those looking to make a statement, patterned tiles or a creative tiling pattern can add a unique touch.
Budget is another important consideration when choosing tiles. While luxury materials like natural stone can provide a high-end look, they come with a higher price tag and may require more maintenance. On the other hand, ceramic or porcelain tiles can be more cost-effective and easier to maintain. Check out our article on tiling on a budget for more tips.
Different Types of Tiles
There are many types of tiles available, each with its own strengths and weaknesses. Here’s a quick overview of some popular choices:
- Ceramic Tiles: These are made from a mixture of clays that are pressed into shape and fired at high temperatures. Ceramic tiles are durable, easy to clean, and available in a wide range of colors and designs.
- Porcelain Tiles: These are a type of ceramic tile that is fired at higher temperatures, making them denser, stronger, and more resistant to moisture. Porcelain tiles are a good choice for high-traffic areas and outdoor use.
- Natural Stone Tiles: These include marble, granite, slate, and limestone. Natural stone tiles are unique and luxurious, but they require more maintenance than ceramic or porcelain tiles.
- Glass Tiles: These are great for creating a modern, sleek look. Glass tiles are resistant to stains, mildew, and mold, making them a good choice for bathrooms and kitchens.
- Metal Tiles: These tiles can add a contemporary, industrial feel to a space. Metal tiles are durable and easy to clean, but they can be more expensive than other options.
Remember, the best tiles for your project will depend on your specific needs and preferences. So take your time, do your research, and don’t be afraid to ask for help. After all, the right tiles can make all the difference in a tiling project, transforming an ordinary space into something truly special.
Tiling Techniques and Tips
Mastering tiling takes time, patience, and a good understanding of the different techniques and tips that can make the process smoother. Whether you’re a professional tiler or a DIY enthusiast, there’s always something new to learn in the world of tiling.
Installation Techniques for Different Tile Types
When it comes to installing tiles, the method used can vary depending on the type of tile.
- Ceramic Tiles: For ceramic tiles, the back-buttering technique often works well. This involves applying adhesive to both the back of the tile and the surface it’s being installed on, ensuring a strong bond.
- Porcelain Tiles: Porcelain tiles, on the other hand, require a slightly different approach. Due to their denser nature, they often require a wet saw for cutting and a special porcelain adhesive for installation.
- Glass Tiles: Glass tiles can be tricky to install due to their transparent nature. It’s important to use a white adhesive that won’t show through the tiles.
- Stone Tiles: Stone tiles require a lot of care during installation due to their porous nature. Sealing them before and after installation can help protect them from stains and damage.
For more detailed information on the installation techniques for different tile types, check out our guide on understanding tile adhesives.
Expert Tips for a Smooth Tiling Process
Here are some expert tips to ensure a smooth tiling process:
- Planning is Key: Before starting any tiling project, it’s crucial to plan out the layout. This helps to avoid awkward cuts and ensures a professional-looking finish.
- Use the Right Tools: Having the right tools on hand can make the tiling process much easier. This includes a good quality tile cutter, notched trowel, tile spacers, and a spirit level.
- Preparation Matters: Preparing the surface correctly is critical. This means ensuring it’s clean, flat, and free from dust and debris.
- Adhesive Application: Apply the adhesive evenly, making sure to remove any excess before it dries.
- Cutting Tiles: When cutting tiles, remember to measure twice and cut once. Also, always wear safety glasses to protect your eyes from flying tile chips.
- Grouting: After the tiles have been installed and the adhesive has dried, it’s time to grout. Make sure to wipe off any excess grout before it dries.
- Sealing: Finally, seal the grout to protect it from moisture and stains.
For more advanced tiling tips, check out our article on advanced tiling tips for commercial projects.
Remember, tiling is an art that requires practice and patience. With the right techniques and tips, you’ll be on your way to mastering this craft in no time.
Common Tiling Mistakes and How to Avoid Them
Tiling may appear straightforward, but even the smallest errors can lead to unwanted results. Understanding common tiling mistakes and how to avoid them can be the key to a successful tiling project.
Identifying Common Tiling Mistakes
- Incorrect Adhesive Selection: Choosing the wrong adhesive can cause tiles to dislodge or become damaged over time. This mistake often occurs when individuals lack information on the different types of adhesives available. For a detailed guide, visit our article on understanding tile adhesives.
- Poor Tile Layout: An ill-planned layout can lead to uneven lines and disproportionate tile cuts. It’s crucial to plan the layout before starting any tiling work.
- Skipping Tile Sealing: Some types of tiles, especially natural stone tiles, need sealing before and after grouting. Neglecting this step can lead to stains and damage.
- Inadequate Grouting: Failing to properly fill the joints with grout can lead to water seeping beneath the tiles, causing them to lift. For expert tips, check out our article on grouting techniques for perfect finishes every time.
- Not Using a Tile Leveling System: A tile leveling system ensures an even tile surface and prevents tile lippage. Learn more about the importance of a leveling system in our article tile leveling systems explained: achieving professional results.
Preventive Measures and Solutions for Tiling Mistakes
- Incorrect Adhesive Selection: Always research and select the appropriate adhesive for your specific tile type and project. If you’re unsure, consult a professional or refer to our article on understanding tile adhesives.
- Poor Tile Layout: Spend time planning your tile layout before starting the project. Consider the shape and size of the room, and remember that symmetry and balance are visually pleasing.
- Skipping Tile Sealing: Ensure you seal tiles that require it, especially natural stone tiles. This will help protect them from stains and damage.
- Inadequate Grouting: Always ensure joints are fully filled with grout. Waiting for the grout to set and then applying a sealant can also help prevent water damage.
- Not Using a Tile Leveling System: Always use a tile leveling system when laying tiles. This will ensure an even surface and prevent tile lippage.
By understanding these common mistakes and preventive measures, you can ensure a smoother tiling process and better results. For more advanced tips on tiling, especially for large-scale or commercial projects, check out our article on advanced tiling tips for commercial projects.
Maintenance and Care for Tiles
Maintaining the beauty and durability of your tiles doesn’t have to be a daunting task. With the right cleaning methods and understanding of when to repair or replace tiles, you can keep your tiled spaces looking their best.
Cleaning and Maintaining Tiles
Regular cleaning is essential to the longevity of your tiles. The process can vary based on the type of tile (ceramic, porcelain, natural stone, etc.), but generally, it involves sweeping or vacuuming to remove loose dirt and debris, followed by mopping or wiping with a damp cloth.
One key point to remember is to avoid using abrasive cleaners or tools that could scratch or damage the tile surface. Instead, opt for pH-neutral cleaning solutions that are gentle yet effective in removing dirt and stains.
For stubborn stains, a mixture of baking soda and water can be used as a safe, natural scrubbing agent. Simply apply the mixture to the stain, scrub gently with a soft brush, then rinse thoroughly.
Grout can often be the trickiest part of tile cleaning. Due to its porous nature, grout can easily absorb dirt and stains, making it harder to clean. A grout cleaner can be used to tackle this issue. After applying the cleaner, let it sit for a few minutes to loosen the dirt, then scrub with a grout brush and rinse.
Regular sealing of the grout can also help prevent staining and make cleaning easier. For more practical tips on maintaining your tiled surfaces, check out how to maintain your tiled surfaces: easy cleaning tips.
When to Replace or Repair Tiles
Despite your best cleaning efforts, tiles can sometimes show signs of wear and tear that require repair or replacement. Common issues include cracked or chipped tiles, loose tiles, or discolored and damaged grout.
Cracked or chipped tiles can often be replaced individually without disturbing the rest of the installation. It’s a good idea to keep some extra tiles from your original installation for this purpose.
Loose tiles, on the other hand, might indicate a more serious issue, such as a problem with the adhesive or substrate. In such cases, it’s usually best to consult a professional to assess the situation and suggest the best course of action.
Grout issues can often be fixed by re-grouting, which involves removing the old grout and applying new grout in the joints. This can refresh the look of your tiles and even provide an opportunity to change your grout color.
Remember, regular maintenance and prompt attention to any issues can help prolong the life of your tiles and keep them looking great. For more advanced tiling tips and techniques, visit our advanced tiling tips for commercial projects section.